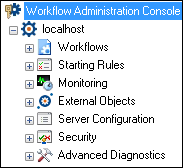
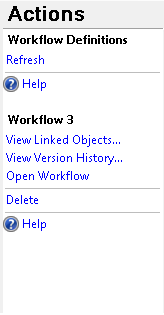
The Workflow Administration Console provides a variety of tools that let you monitor and modify information for each Workflow Server the console is connected to. The Workflow Administration Console has the following categories.
- Workflows: From this node you can open workflow and business process definitions, delete workflows and business processes, see linked objects for workflows and business processes, view workflow and business process version histories, view workflow and business process templates, and audit workflow and business process histories over a specified time period. More information.
- Starting Rules: Enable, disable, or delete both condition and schedule starting rules from this node. You can also audit starting rule histories over a specified time period. More information.
- Monitoring: This node lets you view the subscribers and their trace logs and live event viewers. You can also see outstanding wait conditions, waiting instances, sessions, statistics, and error logs for all your workflows. More information.
- External Objects: In this node, you can manage and configure external objects that interact with your workflow definitions, such as attachments, e-mail servers, trustee directories, data sources, digital signature certificates, and Web services. More information.
- Server Configuration: Configure aspects of the Workflow Server from this node, such as licenses, repositories, the holidays and weekends Workflow observes, ADO.NET reporting, task error handlers, custom activity assembly references, and advanced settings. More information.
- Security: In this node, you can define user permissions, workflow rights, file browsing options, and scripting permissions. More information.
- Advanced Diagnostics: View all tasks, running tasks, persisted instances, running processes, Workflow Assemblies, and Loaded Assemblies from this node. More information.
Tip: You can export the contents of any node in the Workflow Administration Console in a .csv, .xml, or .txt file by selecting the desired node, selecting View from the main menu, and clicking Export Contents. In the Export data dialog box, name the export file, select CSV File, XML File, or Tab Delimited Text File from the drop-down menu, and click Save.
To open the Workflow Administration Console
- Select the Workflow Administration Console
 from your Windows Start Menu or Desktop. Alternatively, in the Workflow Designer, click Tools from the main menu and select Workflow Administration Console.
To connect to a Workflow Server in the Workflow Administration Console
- Select the top node named Workflow Administration Console. In the Actions Pane, click Connect To. Type the name of a Workflow Server, or choose one from the drop-down menu. Click OK. More information.
To interact with Workflow Servers in the Workflow Administration Console
The Workflow Server is the top-most node under which the following nodes are listed. The Server's name is preceded by the Workflow cog icon  .
.
- Disconnecting from a Workflow Server: Select the Workflow Server in the Console Pane, and click Disconnect from Server in the Actions Pane. Alternatively, right-click the Workflow Server and select Disconnect from Server.
- Starting, Restarting and Stopping the Workflow Server service: Select the Workflow Server in the Console Pane, click start, restart, or stop in the Actions Pane. Alternatively, right-click the Workflow Server and select one of these options from the context menu. More information.
- Inducing .NET garbage collection: Select the Workflow Server in the Console Pane, and click Run server garbage collection in the Actions Pane. Alternatively, right-click the Workflow Server and select Run server garbage collection.
Note: This option should only be used when directed by Laserfiche Technical Support.
- Refreshing the Workflow Server node: Select the Workflow Server in the Console Pane, and click Refresh. Alternatively, right-click the Workflow Server and select Refresh.
To configure the Workflow Administration Console
- Configure Columns: For each node in the Workflow Administration Console, you can configure which columns are displayed and their order. More information.
- Show or Hide Panes: The Workflow Administration Console has three panes (the Console Pane, Details Pane, and Actions Pane) and a status bar by default. To configure which panes are displayed in the Workflow Administration Console, select View from the main menu, point to Windows, and select or clear
 Console Pane,
  Actions Pane, and/or
  Status Bar to show or hide these panes.
 - Subnode Appearance: To change how nodes appear in the Details Pane, select any node that contains subnodes and select View from the main menu. Point to Mode, and choose between Details, Large Icons, Small Icons, List, or Tile view.
- Automatically Refresh Nodes: To have a node automatically refresh, select the node, select View from the main menu, and select Auto Refresh.
- Change the Workflow Administration Console language: Select the top node: Workflow Administration Console. In the Actions Pane, click Change Language. Choose a language from the drop-down menu. Select Right to left interface if the language you chose is read right to left. Click OK. You must restart the Workflow Administration Console for your language settings to apply.


